- For the shaman mode that you obtain after hard mode, see Divine mode.

Hard mode is a shaman mode introduced on 30 January 2011 (V0.137). It allows the shaman to hone their skills by limiting what they can and cannot build during hard mode.
After a mouse first hits 1,000 mice saved, they need to restart the game for them to unlock hard mode as a setting. To turn on hard mode, you must select the feather icon next to the emotes in the game's user interface.
Differences between normal and hard modes
Functional
- The shaman cannot use the spirit tool in the map (except in conjuration maps).
- The shaman can not use red (B) nails unless they are part of a totem (totems may only use 1 red nail).
- The shaman is able to create Totems which they can spawn only once per map.
- Every mouse saved is counted as normal save and as a hard save. You can view the amount of hard saves in your profile. There are special titles for hard saves.
Visual
- By default, the shaman has golden decorations on its body instead of blue decorations. As of V0.161, the golden decorations can also be changed to any color you can imagine. You can use this Shamancolor tool to do it (the shaman to the right, for example, would be #97FC00). You can also use an art program (like Photoshop).
- The feather in hard mode is laid back, but in normal mode it's pointing straight up. In addition, a smaller feather is also added.
- There is only one triangular marking on a hard mode shaman's cheek, while in normal mode there are two.
- Hard mode shamans have an extra marking above their eye, shaped in a half-circle.
- There are two ornaments attached to the tail by a string in hard mode, and only one in easy mode.
However, if the shaman is in a shaman battle, cheese thief, or conjuration map, none of these apply.
Totem
Totems are special pre-made system structures that can only be made once a shaman unlocks hard mode, and they can only be used while in hard mode. Totems are modified using the Totem Editor, the link which can be found when you open the same page you use to change your mode. The spirit tool is replaced with a feather, and spawning the feather will create your totem. However, you may only use your totem once per map.
Totem editor
Map 444, which was originally a debug map, is now used for the totem editor, but with some modifications. It now contains several buttons on the bottom marked Reset, Save, and Cancel, and the shaman spawn menu contains all of the shaman objects and nails to make your totem.
Techniques
Due to the absence of red nails, there are some special shaman techniques commonly used by shamans in hard mode (although these can be used out of hard mode as well).
H-structure and anvils
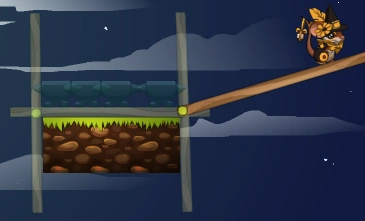
This technique requires a small platform. First place a ghosted long plank horizontally on top of the ground with each end sticking off, then 2 vertical ghosted long plank with yellow nails in the middle on each end. After you have done this, place a few anvils on top of the horizontal bar (in-between the 2 vertical planks).
This technique works as the vertical plank keeps the structure from moving side-to-side, and the anvils keep it flipping when one side becomes too heavy. To this end, it is usually wise to use at least 3-4 anvils.
This technique is usually only done when the platform is really tall or at the bottom of the screen, as you are then not able to make a complete rectangle for stability (see more on this in the technique below). There are different variations of this technique based on the situation (ex: if the platform is big, a lot of horizontal planks may be linked across the length of it).
Rectangle nail
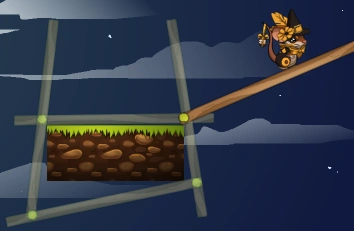
Similar to the technique above, this is different in that it doesn't use anvils, but rather a 4th plank to make a complete rectangle. This is done by placing a ghosted long plank horizontally on top of the ground with each end sticking off, then 2 vertical ghosted long plank with yellow nails in the middle on each end. Then you take a final ghosted horizontal plank, with a yellow nail on the side, connect it to one of the vertical planks, below the ground. This must be done in such a way that the plank will collide with the parallel vertical plank. To finish it, you select an arrow with a yellow nail onto it, and place it where the two planks collide to make a complete rectangle around the platform you're standing on.
This works because it keeps any part of the structure from slipping of the platform. It should be warned that if the structure isn't "tight" enough around the platform, there is a chance the whole thing will flip if too much weight is applied to one side of it.
Ballooned plank

This is done by placing two balloons along the bottom of a flat, immovable surface, placing a plank above them, and then using an arrow to place a C nail to keep them in place. A V nail won't work, as the balloons will start to rotate and move the plank. This technique helps to simulate placing a red nail on a plank.
Trivia
- From 16 June 2011 (V0.161), you could choose your shaman's markings color. The hard mode shaman was also changed to have more decorations than the normal mode shaman.
Gallery
")
")
")
")
")
")
| Shaman | |||||||||||
|---|---|---|---|---|---|---|---|---|---|---|---|
| Modes |
| ||||||||||
| Items | |||||||||||
| |||||||||||